Once you’ve tasted these homemade marshmallows, you’ll never go back to storebought. These fluffy wonders are made without refined sugars or corn syrup, so they’re actually healthy to eat! Our recipe for homemade marshmallows uses honey for natural sweetness in these melt-in-your-mouth (and mug) creations.

Homemade Marshmallows
If you told me a couple of years ago that a healthy marshmallow existed, I wouldn’t have believed you. These are fun and simple to make and perfect for roasting or popping in a cup of coffee or hot chocolate…..they’re so delicious, that we just eat them whole!
Ingredients You’ll Need
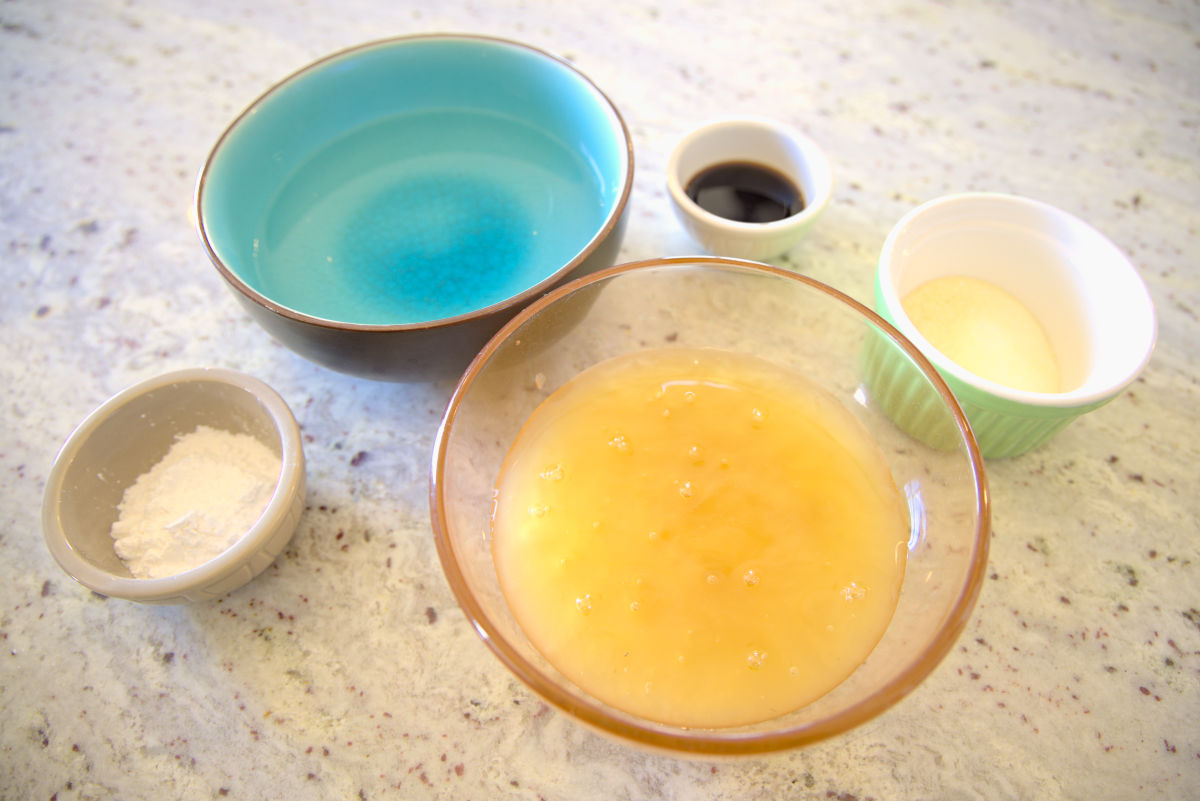
Water- You’ll split your water up to help bloom the gelatin and also create the sweetened syrup.
Honey- Traditional marshmallows are made with corn syrup which is flavorless, but sweet honey adds a lovely layer of flavor. Choose a honey with particular floral or nutty notes that will enhance your marshmallows.
Vanilla Extract- Use pure vanilla extract for the best flavor. We make our own extract using high-quality vanilla beans, high-proof alcohol, and a few months of waiting.
Gelatin- This is what gives your marshmallows that springy, pillowy texture. If you’re aiming for the healthiest marshmallows, use grass-fed gelatin.
Powder- If you want to help prevent your marshmallows from sticking, you can add confectioner’s sugar, cornstarch, or arrowroot powder to the pan and/or use them for tossing your finished marshmallows in. I have had success both without them and with them.
How To Make Honey Homemade Marshmallows
- Line your baking dish with two overlapping sheets of parchment paper. We typically use a 9 x 13 dish.
- Place water in the bowl of a stand mixer and sprinkle the gelatin evenly in the bowl.

- While the gelatin is blooming, place the honey and remaining water in a small saucepan over medium-high heat on your stove. Whisk to combine and bring to a boil.
- Reduce heat to medium and continue to cook until the syrup reaches between 235- 245 degrees F. A candy thermometer can be helpful here. Remove from heat.
- With the whisk attachment on your mixer, mix the bloomed gelatin on low speed, then slowly stream in the syrup mixture with the mixer running. Add in the vanilla. Turn the mixer up to high speed and beat for 8-10 minutes. It is done when soft peaks form. It should be thickened, glossy fluff.
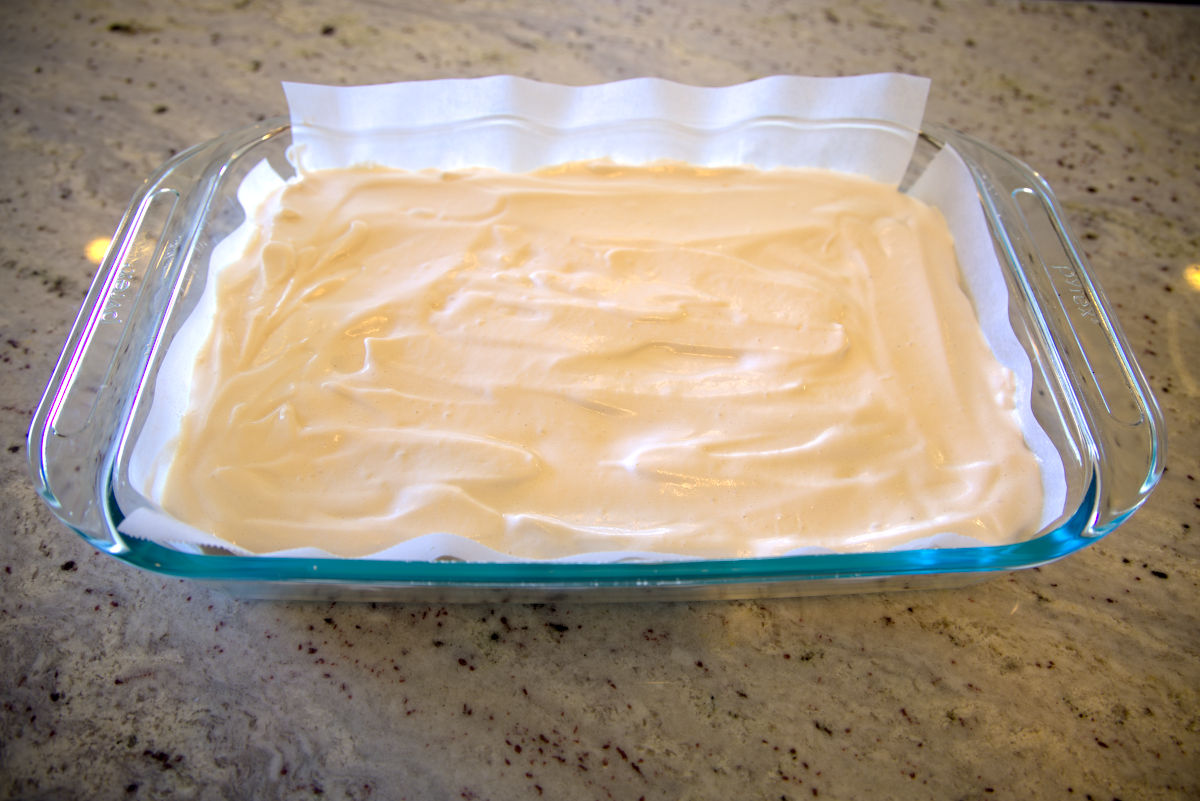
- Quickly pour the marshmallow fluff into the prepared baking dish. Use a large spoon or spatula to even out the marshmallow before it sets.
- Place in the fridge and allow it to set for at least 2 hours or allow it to set for several hours at room temperature.
- Use a knife to cut into cubes of a chosen size. Dusting your knife with cornstarch, confectioner’s sugar, or arrowroot powder can help prevent sticking.
- If desired, toss them in more powder. You can use a small fine mesh strainer or flour sifter to dust the marshmallows.
- Store them in an airtight container. Use parchment paper between layers to protect from sticking.


FAQs (Frequently Asked Questions)
If you’re trying to stick to natural sweeteners, you can opt for maple syrup or agave. A light-colored honey will leave your marshmallow white, but a darker sweetener will turn them slightly golden. Coconut sugar, panela sugar, or cane sugar can also be raw alternatives.
This recipe is gluten free! I haven’t tested it personally, but agar can be a vegan substitute for gelatin in marshmallows.
If you overwhip or underwhip your marshmallows, the consistency can be affected. If your syrup mixture reaches too high of a temperature, it can also throw your consistency off. If they are overly sticky, you might have under-whipped your mixture. Look for those soft peaks.
You can easily alter the size of your marshmallows by choosing a different pan size. For mini marshmallows, use a larger baking tray for a thinner marshmallow fluff layer.
Using a candy (or other high temperature gauge) thermometer is recommended, but I’ve made this recipe successfully without one. Bring the honey mixture to a boil and then reduce to a simmer for 5 minutes before beginning with the steps involving the mixer.
You can store them at room temperature, in the fridge, or in the freezer. We prefer to leave ours at room temperature, as they firm up to a preferable consistency. They will last a couple of months or longer (if you can refrain from eating them all before then)! If you’re looking to use them for roasting, leave them on the counter for at least a couple of days so they can firm up.
More From Scratch Holiday Recipes
Interested in making more of your holiday foods and libations from scratch? Here are a few more of our favorites.

Healthy Honey Marshmallows
Equipment
- stand mixer (or hand mixer)
- small fine mesh strainer or flour sifter (optional)
Ingredients
- 1 c honey
- 3 pk gelatin or 7.5 tsp (.75 oz)
- 1 tbsp vanilla extract
- cornstarch, confectioner's sugar, or arrowroot powder optional
Instructions
- Line your baking dish with two overlapping sheets of parchment paper. We typically use a 9 x 13 dish. If desired, dust the paper with cornstarch, confectioner's sugar, or arrowroot powder to help prevent sticking.
- Place ½ c water in the bowl of a stand mixer and sprinkle the gelatin evenly on top.
- While the gelatin is blooming, place the honey and ½ c of water in a small saucepan over medium-high heat on your stove. Whisk to combine and bring to a boil.
- Reduce heat to medium and continue to cook until the syrup reaches between 235- 245 ℉. A candy thermometer can be helpful here. Remove from heat.
- With the whisk attachment, mix the gelatin mixture on low speed, then slowly stream in the syrup mixture with the mixer running. Add the vanilla.
- Turn the mixer up to high speed and beat for 8-10 minutes. It is done when soft peaks form. It should be thickened, glossy fluff.
- Quickly pour the marshmallow fluff into the prepared baking dish. Use a large spoon or spatula to even out the marshmallow before it sets.
- Place in the fridge and allow it to set for at least 2 hours or allow it to set for several hours at room temperature.
- Remove the marshmallows in parchment paper from the dish and place them on a cutting board. Use a knife to cut them into strips and then cubes of a chosen size. Dusting your knife with cornstarch, confectioner’s sugar, or arrowroot powder can help prevent sticking.
- If desired, dust the marshmallows with more powder. You can use a small fine mesh strainer or flour sifter to do this.
- Store them in an airtight container at room temperature, in the fridge, or in the freezer. Use parchment paper between layers to protect them from sticking.
Notes
- These will last for 2-4 weeks (or longer if frozen).
- I often leave out the powder and don’t mind the slight stickiness.
- The honey you use will affect the final flavor. Choose one you enjoy!


Leave a Reply