My very first introduction to fermentation in a home setting was with sauerkraut about 7 years ago, and I still remember the day so clearly. A friend from work had an informal gathering at her apartment in Chicago, and she gave us some tips on how to make sauerkraut with a little background on the fermentation process. I didn’t know it then, but I would cherish that memory for many years to come.
How to Make Sauerkraut
Sauerkraut was my gateway to the glorious world of fermentation, and once you see how simple, yet rewarding, making your own is I’m sure it will become a staple for your home. It’s one of the easiest ways to support your gut health and add probiotics to your diet. And it only takes two ingredients! Here’s a more in-depth look at fermentation.
In its most simplistic form, the recipe goes like this….chop cabbage, mix with salt, pack into jar, and wait. Let’s get into the details, though.
A Synopsis of Fermentation
Fermentation is an age-old technique that involves altering the properties of food with the use of microbes. It was and is still used as a way of preserving food through a build-up of either acid or alcohol.
Lactic acid fermentation is the type of fermentation at work when we make things like sauerkraut in which the lactobacillus bacteria work to convert carbohydrates into lactic acid. The bacteria consume the starches and sugars in our fruits and vegetables, convert that into oxygen for themselves, and leave us with a tangy food chalked with lactic acid. The salt in our brine kills bacteria that cause food spoilage, but lactobacillus bacteria is left unharmed.
For foods like sauerkraut that contain live cultures, consuming them helps replenish beneficial bacteria in our bodies.
What You Need
Cabbage
You can choose red or green cabbage for your kraut, but make sure it is fresh! A sad cabbage does not make for a healthy, crisp ferment.
Salt
There are different views about the percentage (in regards to the weight of the cabbage) of salt to add to your cabbage, but we have found 2% to be perfectly balanced. Weigh your cabbage in grams and then multiply that by .02 for the grams of salt to add. When I first began my sauerkraut-making journey, I would just salt liberally, massage the cabbage, and add more salt until I got a good amount of liquid to excrete from the cabbage. Know that it doesn’t have to be a science but it can be.
Use a higher quality salt such as kosher or pink Himalayan for fermenting. Table salt or processed salts are not the best choices for fermenting and could negatively affect your success. They are known for inhibiting the growth of healthy bacteria.
Glass jar or fermenting vessel
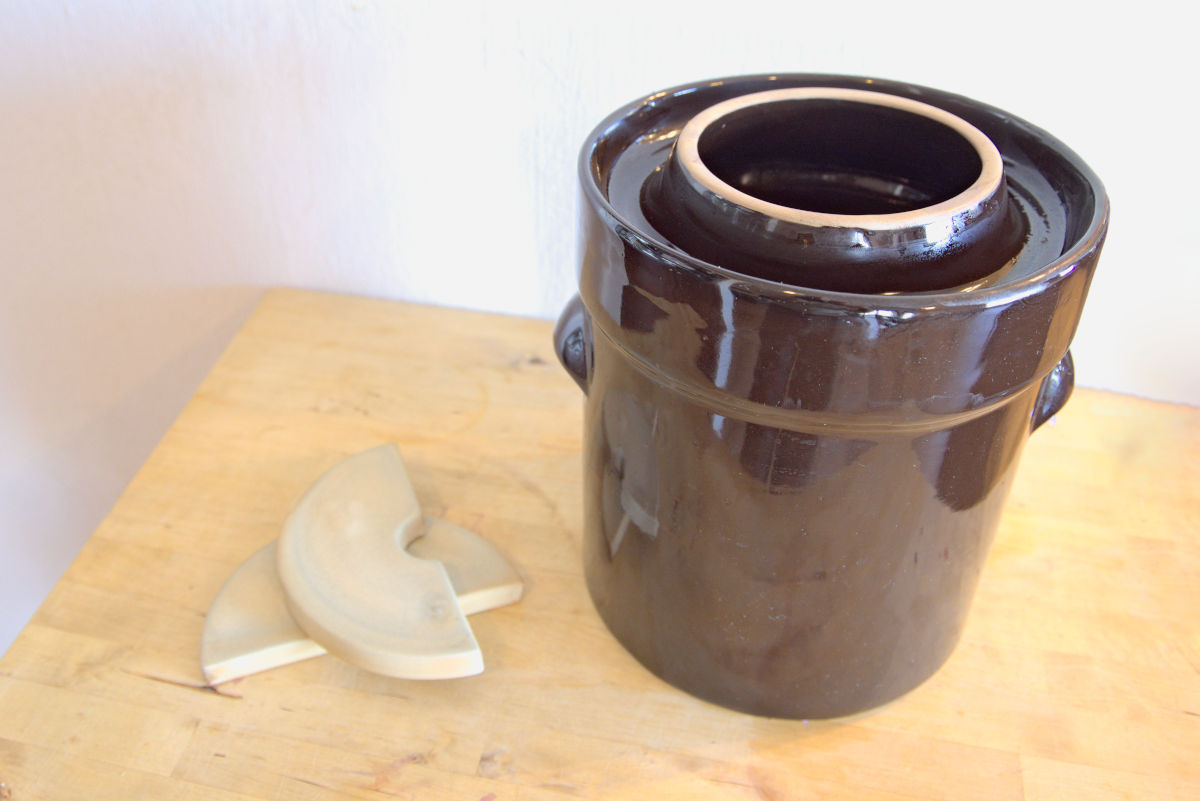
We use a fermenting crock for our sauerkraut now, but we started out with just glass jars. Choose your size based on how much cabbage you are fermenting. Ensure your equipment is sterilized (warm water and soap will do) as you want to start with a clean, bacteria-free environment.
There are two types of fermenting crocks- open crocks and water-sealed crocks- that would work well for making sauerkraut. We use a water-sealed crock because its water lock is the best way to avoid the development of both kahm yeast (not harmful, but should be removed before consumption) and mold. Bubbles from the ferment (CO2) can push their way out, but outside air can’t make its way in. Just check it every few days to make sure there is still a layer of water in the top well area.
Weights
You’ll need a weight to keep your kraut submerged in its brine. Without one, you risk the development of mold which can ruin your ferment. This weight can come in the form of a small glass jar filled with water, a glass fermentation weight, or the fermenting crock weights. You need something clean and non-reactive. You can also use a plastic bag filled with water! When I started fermenting more often I invested in some weights to cut down on the single-use plastic, but it’s definitely an option. Especially when just starting out.
Cover
For us, that cover comes in the form of the lid on our crock. It used to come in the form of a piece of an old pillowcase secured with a rubber band around the rim. You are trying to create the safest environment for CO2 to be able to be released but for the least amount of oxygen to be able to enter. There are many suggestions on the internet about using coffee filters, airlock lids, and more.
How to Make Sauerkraut
Remove the outer leaves of your cabbage head and give it a gentle rinse. With a sharp knife, cut your cabbage into quarters and remove the core from each piece. Slice your cabbage pieces into thin ribbons and place them in a large mixing bowl.
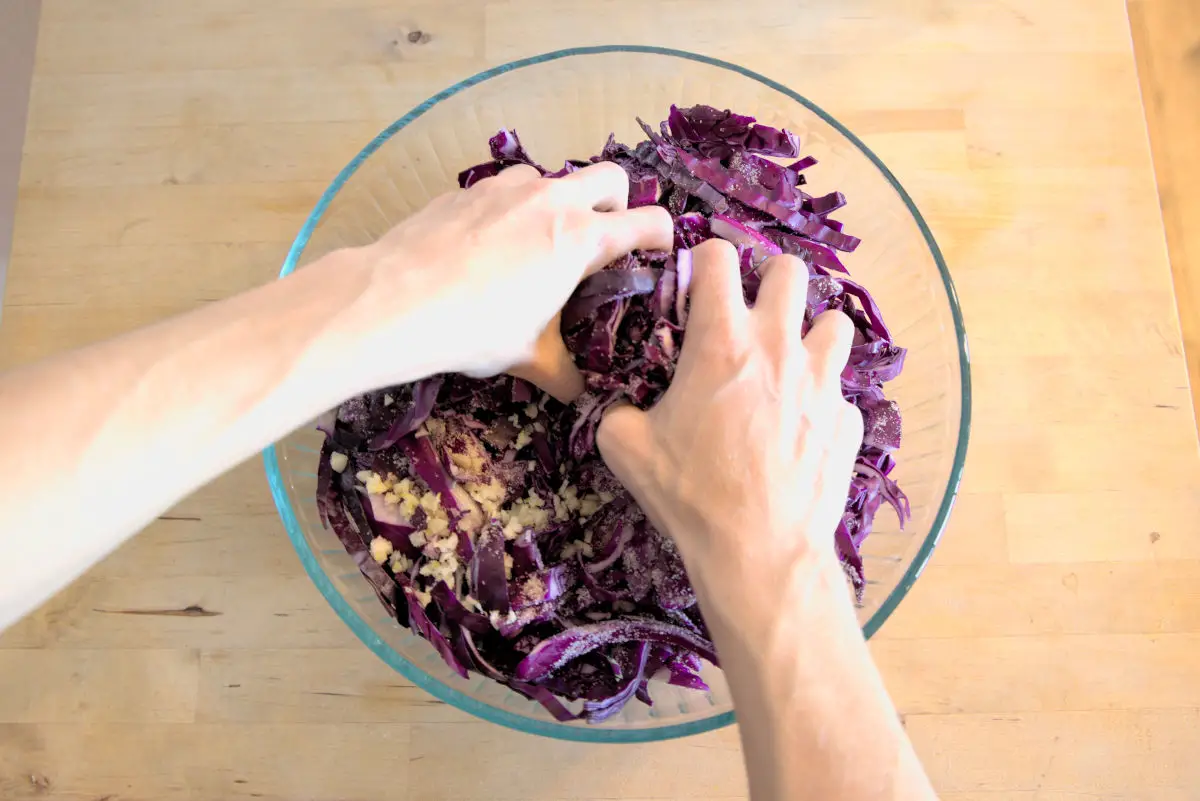
Add your salt (if measured, at approximately 2% of the weight of your cabbage) and begin massaging, with clean hands, the salt into the cabbage. This process will take 5-10 minutes, so be patient. The cabbage will tenderize and release liquid here. You want the cabbage to have softened and released enough liquid so that it can be submerged in it when packed down in your vessel. You can let your cabbage mixture rest for a few minutes before filling your vessel and it will release more liquid.
Place your cabbage in your vessel and pack it down with your fist or a clean utensil. You’ll want to leave at least an inch and a half of room at the top. Place your fermenting weight(s) on the cabbage mixture. If there isn’t enough liquid to where the cabbage is submerged, you can add filtered (non-chlorinated) water until it is.
Cover your vessel with its lid or cloth secured with a rubber band. Place your vessel at around room temperature and out of direct sunlight. Check once a day that the cabbage is still submerged, and add more water if it has evaporated below the solids. If you see bubbles forming, this is just a sign of a healthy ferment. If you see kahm yeast forming (see troubleshooting for further explanation), skim it from the top. If you see mold forming you might want to toss the batch and start over unless it is very minimal and you can safely skim it from the top.
You can check your cabbage after as few as 3 days for readiness or allow it to ferment for weeks. I think the sweet spot is between 3-6 weeks, but the taste will tell you.
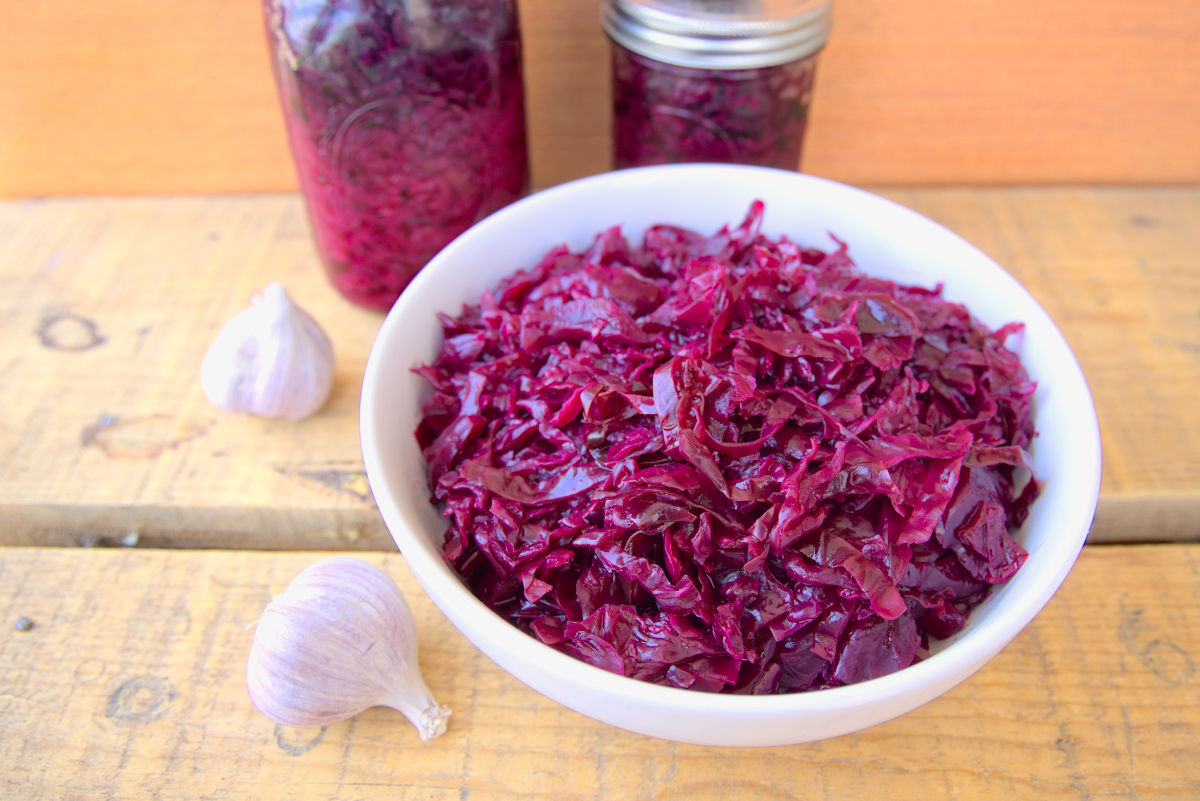
Spoon your finished sauerkraut into new jars to seal or add a sealed lid to the jar you were fermenting in. Keep in mind that it will continue to very slowly ferment, but placing it in the fridge will greatly slow down the process. Your kraut will keep for 4-6 months in the fridge or even a year if kept properly (ensuring brine stays above kraut and using a clean utensil every time you take some from the jar).
Variations
There are a ton of additions that can give your kraut some extra flare. Here are a few ideas:
- Shredded carrots
- Minced garlic
- Curry powder
- Sliced onion
- Fresh herbs
- Hot peppers (sliced)
- Beets
- Minced ginger
- Dill
- Caraway seeds
…..mix and match to find your favorite combination.
Troubleshooting
If you see a white film appearing on your ferment, fear not. Kahm yeast is not a mold, but rather an aerobic yeast. It isn’t harmful, but you’ll want to remove it before consumption. Kahm yeast tends to have a stringy, bloom-like look. Mold develops differently. Check for fuzziness, discoloration beyond a cream color, and the development of single spots. It is possible to remove small bits of white mold safely, but if discoloration has occurred you should toss your ferment to be safe.
You can try fermenting at a cooler temperature or with a higher percentage of salt to reduce the chances of kahm yeast formation.
Enjoying Your Sauerkraut
Not that you need an excuse other than “it’s delicious” to make and eat sauerkraut, but it’s loaded with health benefits. It’s rich in vitamins, minerals, and probiotics. These are active in supporting gut health, helping with digestion, and contributing to building up your immune system. It is low in caloric value but high in fiber, so it can aid in weight loss.
Now for the fun stuff…..Add it to your salads, plop it on top of a rice bowl, eat it with sausage and mustard, use it to spruce up your wraps and sandwiches, try it alongside fried eggs in the morning, or just eat it right out of the jar. Get creative!
FAQs (Frequently Asked Questions)
A wide-mouthed glass or ceramic jar, a weight to keep the cabbage submerged, and a cloth or paper towel for covering are the basic equipment needed. Specialized fermentation crocks are also available.
Sea salt, kosher salt, or Himalayan pink salt without additives are suitable for sauerkraut. Avoid iodized salt, as it can inhibit fermentation.
The ideal temperature is around 65-75°F (18-24°C). Cooler temperatures may slow down fermentation and warmer temperatures will speed it up.
More On Fermentation
There’s no ignoring the health benefits of fermentation, and making your own fermented recipes is a fun and rewarding process.
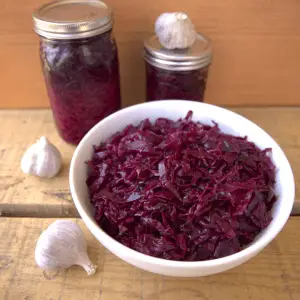
Homemade Sauerkraut With Red Cabbage & Garlic
Equipment
- 1 large bowl
- 1 glass jar or vessel
- 1 cover or cloth
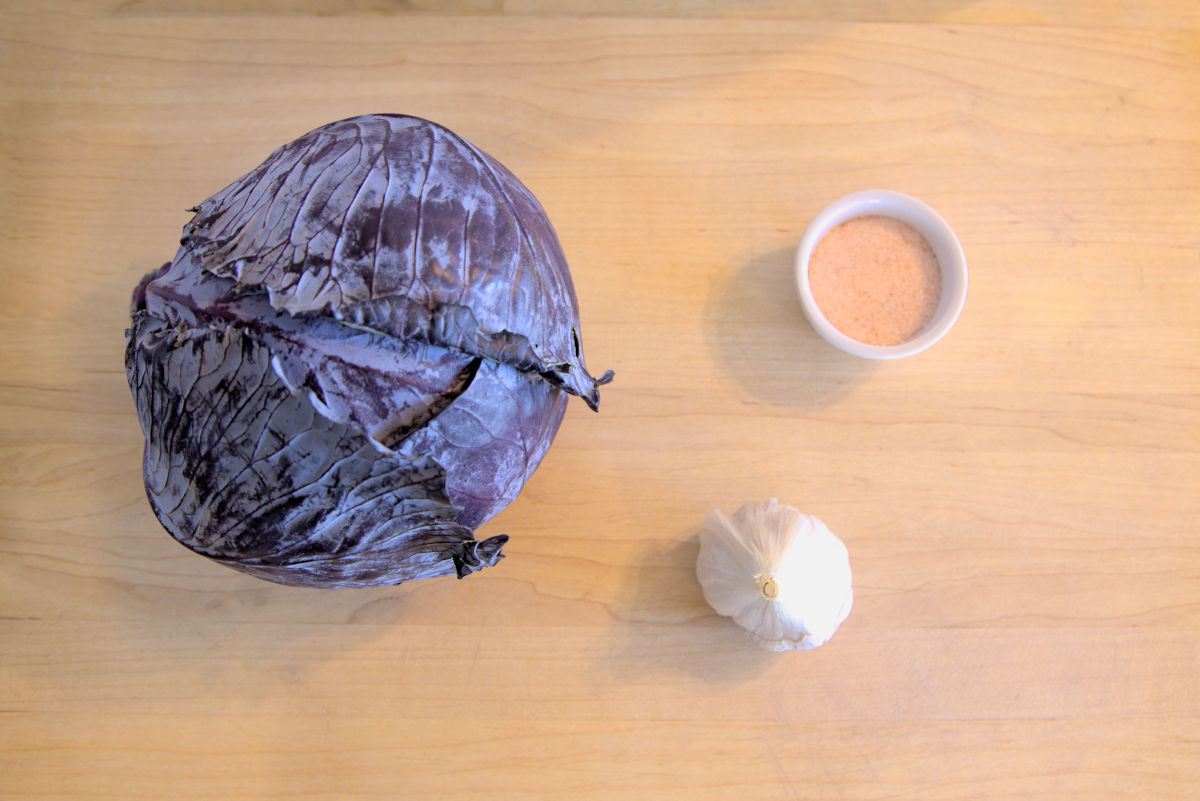
Ingredients
- 1 head of red cabbage
- 8 cloves of garlic
- kosher or himalayan pink salt 2% of your cabbage's weight
Instructions
- Weigh your cabbage in grams. Make note of the weight for calculating the salt to add.
- Shred the cabbage with a sharp knife or on the large holes of a grater. Peel and mince the garlic.
- Combine cabbage and garlic in a large bowl and add your salt. For a 2% salt ferment multiply the weight of your cabbage by .02. Massage with your hands for 5-10 minutes. Liquid will begin to emerge, and you'll massage until there is sufficient liquid to keep the cabbage submerged in your jar. You can rest and allow the cabbage to secrete more liquid in the middle of this process.
- Pack mixture into your vessel. You can use your fist or a large utensil to help. Make sure to leave at least 1 ½ inches of headspace. Place your fermentation weights on top. If the liquid does not rise above the cabbage, add some filtered water.
- Cover your ferment with the lid from your fermenting crock or cloth secured with a rubber band. Allow kraut to ferment at room temperature in a dark location for anywhere from 3 days to several weeks. Ferment to your taste. The sweet spot for me is between 3 & 6 weeks.
- Spoon sauerkraut into new jars to seal or add a lid to seal in the jars you were fermenting in. Placing them in the fridge will help preserve the sauerkraut and greatly slow down the fermentation process. Your sauerkraut will keep for 3-6 months (with the possibility of longer). For optimal storage, make sure your brine stays above the kraut and you use a clean utensil when serving from the jar.
Notes
- Feel free to experiment with variations including different spices and vegetables. There are suggestions in the blog post.
- After 3 days of fermenting, you can taste your sauerkraut using a clean utensil to determine when its flavor is to your liking. Keep fermenting until the sour quality is at the right level for you.
- Make sure all of your materials are sanitized (warm water and soap will do) before the process. Unwanted bacteria can negatively affect the ferment.


I tried making home made sauerkraut in a 5 gal. crock some 44 years ago. I did not weight the solids down below the liquid, I did use a cheesecloth covering , bugs got in through the cheesecloth, and some of the solids got moldy. It smelled pretty bad as I remember. I ended throwing the whole batch out, and never tried again.. I needed the above tips from Michelle and Bradley.. Once in Budapest, we went to the pickled section of the market. There were 55 gal wood barrels of 10 different pickled vegetable. The Best! The owner just used his hands to scoop our what ever you wanted and sold it in a plastic bad by weight. I don’t think his hands ever looked white.
I love this story! Makes me want to visit Budapest. Glad you found some useful tips here.